-
Maker inspiration from SF's Exploratorium
Wednesday, December 25, 2013
Saturday, December 21, 2013
Friday, December 20, 2013
Educational Resources & Tech Tools 12/21/2013
-
Suggested apps and web tools as they apply to Bloom's taxonomy.
Wednesday, December 18, 2013
Educational Resources & Tech Tools 12/19/2013
-
- Consider this if your are a GAFE school.
-
For the tech challenged.
-
Extensive American history video archive.
-
- YouTube is really special because it is a searchable video library where videos are immediately sharable to anyone in the world.
- YouTube is important because it is social.
-
-
Summary of a study on causal relationship between visiting an art museum and having greater appreciation for the human condition.
Tuesday, December 17, 2013
Educational Resources & Tech Tools 12/18/2013
- College papers: Students hate writing them. Professors hate grading them. Let’s stop assigning them.
- Hilarious article on why assigning papers might be more of a punishment for teachers than for students.
-
-
Reasons to build a PLN.
-
For when you need a laugh.
PLN - Got one?
One of the buzz words/acronyms that has been flying around for some time is PLN. The abbreviation stands for personal learning network. However, I like to think of it as a professional learning network because I use my PLN to help me do a better job as a tech integrationist.
Here's what a PLN can do for you.
So what does a professional learning network look like? Well for me it started off slowly with Twitter. I began by subscribing to a bunch of educators who were recommended to me by a friend and then eventually by Twitter itself. (Twitter generates suggestions based on who you currently follow.) You can follow me @JillBergeron2 and see who I'm following. Wanna know more about Twitter? Check out this amazing guide put out by Edudemic.
From Twitter, I moved on to Diigo, a social bookmarking site. When you sign up for Diigo, be sure to sign up for a teacher account through Diigo in Education. This has been such an asset to me in my job and here's why. Diigo will send you bookmarks either every day or every week (your choice) that are specifically related to education. You can sort through other teach bookmarks by use the tags. Again, just like Twitter, this is a site where you can follow other educators whom you respect.
My third foray into building my PLN has come through MyYahoo RSS reader. What a reader will do is pull the most recent posts (typically just the headlines) from a set of blogs to which you subscribe. It collects all of these headlines in one place for you to browse at your convenience. What you need to look for is the icon to the right. Click on it and it will ask you which reader you want to use. I like Yahoo because it's always an option on any site, but there are plenty of others to choose from. Then find some blogs that appeal to you. Edutopia and Edudemic are good places to start.
Here's what a PLN can do for you.
- It will help you build a community among like minded educators.
- It will shower you with unique ideas, links, articles and videos.
- It will prevent you from having to Google everything because now you will have a reliable network from which you can pluck resources.
So what does a professional learning network look like? Well for me it started off slowly with Twitter. I began by subscribing to a bunch of educators who were recommended to me by a friend and then eventually by Twitter itself. (Twitter generates suggestions based on who you currently follow.) You can follow me @JillBergeron2 and see who I'm following. Wanna know more about Twitter? Check out this amazing guide put out by Edudemic.
From Twitter, I moved on to Diigo, a social bookmarking site. When you sign up for Diigo, be sure to sign up for a teacher account through Diigo in Education. This has been such an asset to me in my job and here's why. Diigo will send you bookmarks either every day or every week (your choice) that are specifically related to education. You can sort through other teach bookmarks by use the tags. Again, just like Twitter, this is a site where you can follow other educators whom you respect.
| RSS Symbol |
Monday, December 16, 2013
Educational Resources & Tech Tools 12/17/2013
-
Could be worked into character education.
-
Good idea for STEM or for PD.
-
Quick summaries of these apps (work on laptops and tablets) followed by equally short descriptions of how they work in a flipped setting.
-
For iPad users.
Friday, December 13, 2013
Educational Resources & Tech Tools 12/14/2013
-
Short video lessons in here that explore the modern era as well as history. Good for STEM, language arts and social studies.
Thursday, December 12, 2013
Educational Resources & Tech Tools 12/13/2013
-
Article from the Gates Foundation.
-
A catalog of game based learning resources.
-
MakerBot Academy Math Manipulative Challenge
-
Op-ed on how workers will need to be complements to computers.
-
Learn Google Drive workflow management in my webinar series How to Use Google Drive In School – January 2014 http://t.co/d43mNkOaps
Wednesday, December 11, 2013
Educational Resources & Tech Tools 12/12/2013
-
Options for teachers looking for relevant classroom YouTube videos.
-
Great article on differentiation.
-
Top math blogger in US.
-
Great math resources for MS math teachers. Coincidentally put together by MS math teacher.
Head, Heart, Bag, Bin
Last week our sixth grade social studies teacher, Andy Hulm, presented to our faculty a catchy framework for thinking about how we teach and how students learn. Andy had just returned from a trip to his native England following a family gathering and a visit to his former school. One of the teachers there shared with him his teaching philosophy which is outlined in the
graphic below.

graphic below.

One of the ways in which this can work is by having students write on post-it notes for each category. These thoughts can then be transferred into a writing assignment. And so while this can be utilized with a number of technology tools, it can also be used with pen and paper.
Tuesday, December 10, 2013
Educational Resources & Tech Tools 12/11/2013
-
How to build your own search engine using Google. Great for LS teachers who want to limit the sites their students can visit but also give the children an opportunity to learn how to search.
-
See the interactive graphic for ideas on how to use Google Drive in the classroom.
-
Helpful ways for schools without a 1:1 laptop program to use Google Drive for teaching and learning.
Monday, December 9, 2013
Educational Resources & Tech Tools 12/10/2013
-
Differentiation for elementary school music.
-
For those interested in educational chats via Twitter.
-
This is a truly comprehensive list of no registration web tools which is great for teachers of children under 13.
-
Great article on the need to help students better learn to concentrate given the distractions that digital devices provide.
- “The real message is because attention is under siege more than it has ever been in human history, we have more distractions than ever before, we have to be more focused on cultivating the skills of attention,”
-
- Learning Music - Symbaloo
- A great compilation of music tech tools.
- Backwards Edtech Tool Flow Chart
This is a phenomenal chart for matching goals with tech tools. -
Some good journaling prompts here. Especially if your students are using a blog for journaling.
-
For anyone who embeds YouTube videos, it's worth checking this out.
-
Transition to GAFE from FC.
-
For Chandler's email transition.
-
This might be a possibility for our MS students when we introduce GAFE.
-
This teacher does a great idea of helping his students share their work. And he has done it using a platform that we use at Chandler.
Friday, December 6, 2013
Educational Resources & Tech Tools 12/07/2013
-
Good explanation of Easel.ly with warning that it does not work on Chrome.
-
Based on the terms of service and privacy policies of the these five sites, I would recommend Infogr.am and easel.ly for teachers with students under 13.
-
How to use Twitter to help build your learning network. This is a great article for helping teachers understand how to use Twitter for PD.
Thursday, December 5, 2013
Educational Resources & Tech Tools 12/06/2013
-
- From the students, integration demands creativity, problem-solving, perseverance, collaboration and the ability to work through the rigorous demands of multiple ideas and concepts woven together to create a final product. Integration is not simply combining two or more contents together
- By weaving the arts into and through our content in naturally aligned ways, we are providing relevance to student learning, and giving them an opportunity to connect their world to our classrooms
-
- The keys to using Arts Integration successfully are:
- Collaboration between arts and classroom teachers to find naturally-aligned objectives
- Using an arts area in which the classroom teacher is comfortable (for many, this starts with visual arts)
- Creating a lesson that truly teaches to both standards
- Assessing both areas equitably
- Sample Arts Integration Lesson Seeds
-
-
Transforming student learning through tech. Substitution, augmentation, modification, redefinition.
Mandela and the Mockingbird
Right now, our eighth grade students are writing reflective essays in response to Harper Lee's To Kill a Mockingbird. Tomorrow as they continue through this process, it will be in the shadow of a life spent fighting segregation and injustice. With Nelson Mandela's passing, nations and individuals alike will mourn the death of a leader whose influence extended far beyond his own country's borders. Chandler's students will see these quotes in Ms. Dretzka's classroom as they reflect on a book that also sought to challenge a policy of institutionalized segregation.
Wednesday, December 4, 2013
Educational Resources and Tech Tools 12/05/2013
-
Great videos for explaining abstract concepts with tangible drawings.
-
Free math resources with some decent looking lessons that can be sorted by grade level or concept.
-
Create interactive visuals for class projects.
Parent CATIE 12/3/13
Yesterday, Chandler School hosted its third Parent CATIE (Conversations About Technology In Education) forum. As a school with a one to one laptop program, we seek to educate all members of our community in the best uses of technology. To that end, we invited parents to join us for a session on safety and social media. We opened the session with a light-hearted video of Louis CK discussing the overwhelming urge to use technology because you can! We then moved into a survey where we asked the parents to think like their children and answer four questions on how kids use social media. We then compared the responses of the parents with those of the students. Turns out, parents do know their kids! Based on the information provided to us by the students, we then went over how to set safety filters on YouTube and discussed how children, and teens in particular, are using SnapChat and Instagram. Below is material we covered with links included.
Social Media Tips
Social media safety
YouTube
5 Ways to Keep YouTube Safe and Fun for Kids
- Enable YouTube Safety Mode
- Use Internet Filters
- Keep the Computer Public
- Speak With Your Kids
Snapchat (for use on mobile devices only)
- Sexting information via Common Sense
Instagram
- hashtags (#somuchfun)
Social Media Tips
Google Cultural Institute
The Google Cultural Institute is an amazing collection of images and documents curated by leading institutions around the world. The have partnered with Google to help bring these amazing works, some of which never see the light of day in their own facilities, to a global audience. Whether you teach history, art or math, there is something in here for everyone. The two videos below give an introduction to the online institute.
The first video will make you want to use the site.
This second video explains some of the wonderful offerings put forth by the Google Cultural Institute.
The first video will make you want to use the site.
This second video explains some of the wonderful offerings put forth by the Google Cultural Institute.
Monday, December 2, 2013
Education Articles & Technology Tools 12/03/2013
-
Cool tutorial on how to post bookmarks to blog. One less click for teachers!
-
Good article on how to make PD relevant and appropriate for teachers.
-
Hilarious video on what Facebook would look like in real life.
Wednesday, November 20, 2013
Parenting in the Digital Age
Two weeks ago, our school invited Catherine Steiner-Adair, author of The Big Disconnect, to speak to our community about "protecting childhood and family relationship in the digital age". As a new mom, I didn't feel like I needed to start worrying about online safety just yet; after all, my son is only 15 months old. Nevertheless, I was surprised to learn that there are steps I should be taking now that will aid in his development with regard to technology. To be specific, the American Academy of Pediatrics recommends that children between the ages of 0-2 have no screen time, while children from 3-5 have very limited exposure to screens. That seems easy enough, but screens are so pervasive in our lives that trying to limit exposure to them can become a game of hide and seek with one's cell phone. And as we work hard to limit our infants' and toddlers' exposure to screens, what are we doing to help older children? Do we even know how to help them find balance, focus and self-confidence in this digital age? Perhaps start with this.
Recently, the Huffington Post ran an article entitled, Here's What A Constantly Plugged-In Life Is Doing To Kids' Bodies. The article details the ways in which media affect children. But rather than leaving parents feeling hopeless, it offers tangible solutions to each of the problems it mentions. Moreover, it's embedded with links to research on this topic. Still, one article is not enough to help our children navigate the tricky waters of screens and social media. So where to turn? Consider these options. First, subscribe to sites like Common Sense Media and Edutopia. Both offer parents great advice from experts in the fields of technology and education, and each has sections dedicated specifically to parenting and families. Second, familiarize yourself with the technology your children use. Chances are they aren't on Twitter and they probably just think of Facebook as something adults like. But Instagram, yeah, they love Instagram! Want an inside perspective on this, click here and see what it's doing to kids lives. Finally, consider modeling the behavior your wish to see in your children. If you want them to put down their phones, make sure you are doing the same!
Recently, the Huffington Post ran an article entitled, Here's What A Constantly Plugged-In Life Is Doing To Kids' Bodies. The article details the ways in which media affect children. But rather than leaving parents feeling hopeless, it offers tangible solutions to each of the problems it mentions. Moreover, it's embedded with links to research on this topic. Still, one article is not enough to help our children navigate the tricky waters of screens and social media. So where to turn? Consider these options. First, subscribe to sites like Common Sense Media and Edutopia. Both offer parents great advice from experts in the fields of technology and education, and each has sections dedicated specifically to parenting and families. Second, familiarize yourself with the technology your children use. Chances are they aren't on Twitter and they probably just think of Facebook as something adults like. But Instagram, yeah, they love Instagram! Want an inside perspective on this, click here and see what it's doing to kids lives. Finally, consider modeling the behavior your wish to see in your children. If you want them to put down their phones, make sure you are doing the same!
Wednesday, October 30, 2013
Common Sense Media Makes Sense
If you haven't perused Common Sense Media's site yet, take a few minutes to do so. As a parent and educator, I am blown away by the resources they provide to their audience. Their "Best of . . ." lists provide age appropriate recommendations for games, movie, apps, websites, books and more. The corresponding blog, Making Sense: Parenting, Media and Everything in Between also offers a plethora of timely articles on newsworthy items. And for educators looking to incorporate digital citizenship lessons into their curriculum, there is a wonderful scope and sequence with accompanying lesson plans. Take a look!
Tuesday, October 22, 2013
Prezi: A Spicy Version of PowerPoint
If PowerPoint is a merry-go-round, then Prezi is a roller coaster. It zooms in, it zooms out, it zips here, there, spins upside down and after it's all done, your hair is standing straight up and you're back at the beginning. That metaphor is not meant to detour you from using it, but rather to excite you about how your students will experience Prezi presentations. Let me give you one more example of how Prezi operates. If you are a Google Earth user, think of how you start off looking at the Earth from outer space. You type in your address and before you know it, you are hurdling toward your home at breakneck speed, stopping just above your roof. From there you decide to type in Nice, France (because you've always wanted to go to the south of France. You zoom across the country and over the ocean to land on the French coast. Now translate that experience to a presentation.
To learn how to use Prezi, I recommend watching the video below. (Set aside about 30 minutes to watch and do.) Jen Johnson, the instructor, is very detailed, but you get a wonderful sense of how to use all of the tools in Prezi without feeling overwhelmed. Make your own Prezi as your watching the video; just pause it after each instruction and try the tool for yourself. By the end, you'll have your first presentation completed. Just remember, when you display your presentation, change the display setting in System Preferences to 1024 x 768 for a 4:3 ratio.
For more tips and tricks on Prezi, check out Dan Steer's blog post "The Best Prezi Tips I Found Today".
**If you embed your Prezi then make sure the embed code is https not http. Did you get that? Add an S.
Tuesday, October 8, 2013
Lists for me, lists for you, lists for two
Two work flow apps that I have begun to use to track my work are Workflowy for tasks that I need to get done and Azendoo for tasks that I need a group of people to get done. Both are appropriate for middle school students, though they will need to create accounts.
Workflowy is great for the person who finds himself/herself writing out lists of things to do at home and at work. Keep them both in the same place and then embed lists within lists. Does this sound like a Type A person's dream come true? It is! Sync between your computer and phone. Get daily updates on what you've done and what you still have to do. Watch the demo video below, sign up and start making lists.
As for Azendoo, here is a great way to break up group projects into small tasks assigned to specific group members. You can set due dates, sync with other mobile devices, and link work to apps like Evernote, Dropbox and Google Docs. All parties can be held accountable and work becomes transparent when everyone is working via collaborate apps. To learn more about how you and/or your students can use Azendoo effectively, visit the help page for answers to your questions. To get a visual sense of how this software can be helpful, watch the promo video below. Other tutorials exist on YouTube.
Thursday, September 26, 2013
Three Blogs I Love
If you are looking to expand your understanding of technology in education and you already have a sturdy foundation, I would recommend these three blogs to you. The last one, Edutopia, also has content related to all areas of education.
Educational Technology and Mobile Learning
The author, Med Kharbach, describes the blog as "a resource of educational tools and mobile apps for teachers and educators". Topics include: posters, iPad resources, teacher guides, YouTube for teachers, teacher tools and free downloads.
Free Technology for Teachers
Richard Byrne provides amazing free tools to teachers with quick explanations on how to use them. His tabs include: iPad apps for schools, Google tutorials, free guides, alternative to YouTube, video creation resources, and creating blogs and websites.
Edutopia
Edutopia is a wonderful resource tech tools, lessons, new teacher tips, grade level appropriate material, and almost any other topic related to education. They host educational blogs (which is why I have included it here), classroom guides, videos and educational resources. If ever you are stumped by a problem, I encourage you to look here.
Addendum:
Edudemic just reposted their "Fabulous Education Technology Blogs Worth Following".
Tuesday, September 24, 2013
Embedding Videos
If you are still linking videos from a website, consider embedding them. When you embed a video, it shows up right on the page where you have placed the code. People visiting your page will be able to see the video in context without being directed away from that page and without having to open another window. Here are two ways to embed a video. You can either use YouTube or Google Drive.
Directions for Google Drive:
If you own the video (meaning you made it) and you do not wish to use YouTube as the host (perhaps you don't want any ads associated with your video), consider uploading it to Google Drive. Here's how to do that:


Directions for Google Drive:
If you own the video (meaning you made it) and you do not wish to use YouTube as the host (perhaps you don't want any ads associated with your video), consider uploading it to Google Drive. Here's how to do that:
- Log on to Google Drive, click on the upload button (it's the red arrow pointing up and it's next to the Create button on the left side of the screen).

- Select your video to upload.
- Once the video is uploaded, select it and click on the Share button to change viewing access from Private to Public if you want to host it on a blog or website.
- Right-click on the uploaded video file and select Open with – Google Drive Viewer.
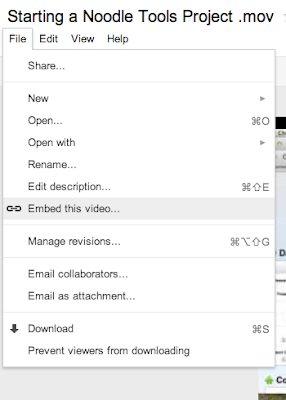
- Once it opens, click on the file menu in the top left corner and select embed this video.

- Copy and paste the code into the HTML view of your website.

Directions for YouTube:
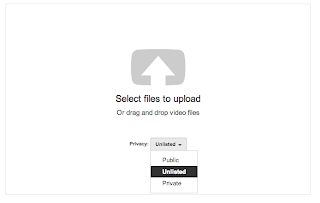
- Once signed in on YouTube (use your Google sign in), click on the upload button.
- Change the privacy setting to Unlisted and the either drag your video into the upload box or select it from the browser menu.

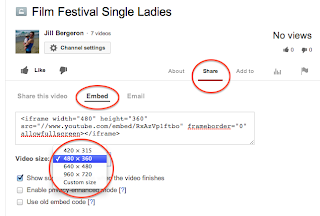
- Click on the video link

- Look for the Share button below the video and click there. Then choose embed. From here you can select how big you wish your video to be. If you click on "custom" you can specify the exact size of your video.

- Paste that code into the HTML view of your website.
Thursday, September 5, 2013
Pinterest, Evernote and Pocket
I read an article last year by a person who said that there are three tools that allow him to be super efficient in his work. Two of those tools were Pocket and Evernote. I wish I could remember who posted the article so I could give him proper credit; alas, I didn't save it to either Pocket, Evernote or Diigo- how ironic! Oh well, let's move ahead. Below I'll quickly explain how and why I use each tech tool. If you want to see a screencast of this information, click on the video at the bottom.
Pinterest: Pinterest is a visual curation site. Think of it as a bulletin board where you can tack up images of things you like. It's great for collecting ideas that have some visual component to them. In terms of education, you might use it for classroom design or projects with students. For me, Pinterest is more for personal collections- cooking, home decor, fashion.
Evernote: Evernote is an application that let's you write notes and access them anywhere. If you download the application to all of your devices (phone, tablet, computer), you can easily access your notes anywhere. You can also access them via the web which means if you are without your personal devices, you can still get hold of your notes. Furthermore, you can tag (label) your notes in multiple way and save them to folders. This means if you can't quite remember where you put that note, you can type in one of your tags and find it. Last bit on Evernote...you can also save websites here. This way you have your notes and websites in the same place. You can also highlight and take notes just like in Diigo.
Pocket: Pocket used to be known as Read It Later. Here's how it works. Once you have downloaded the extension for your browser (a little button that lives in your browser toolbar), you can click when you are on a webpage that you want to come back to later. This isn't a bookmarker per se. Think of it more as a place where you collect all of those pieces you want to read when you FINALLY have time! Once you are finished reading the article, you either delete it or archive it OR... you could even save it to Evernote or Diigo.
Tuesday, September 3, 2013
The Value of Diigo
Diigo, while not new, is still worth writing about. Many of us are used to bookmarking within our web browser. And while that has been a fine organization system for years, it might be time to upgrade. It's just a little button that typically sits near your address bar. If you are reluctant to change over to a social bookmarking platform, consider these points:
You might be thinking, "yes, all of these features are great, but is it really SO much better than a web browser?" For me the answer is yes and here is why I am using Diigo.
Here is where to get Diigo (you can even upgrade your account by clicking on Education Edition on the right side of the screen) and here are two resources on how to use it.
A Guide to Annotating using Diigo from José Picardo on Vimeo.
Remember this is just a Diigo primer. Learn three things about now and figure out the rest later. You don't need to know everything right now and you can't anyway!
- Diigo allows you to access your bookmarks on any device at any time.
- You can organize them by tags (think of these as labels) which means that a bookmark can be labeled in multiple ways. So the website doesn't have to live in one folder. It will even suggest tags based on the site's content.
- Moreover, you can easily share your bookmarks with others. And, yes, you can import your bookmarks from your old web browser.
- As you read, you can highlight and take notes. These stay with your website whenever you open it.
You might be thinking, "yes, all of these features are great, but is it really SO much better than a web browser?" For me the answer is yes and here is why I am using Diigo.
- I can ask my students to read an online source and take notes. Then I can show them my notes and share them as well. They'll learn from modeling.
- I don't have to scroll through long lists of sites anymore. Just type in a tag and up come the sites I have associated with that tag.
- I don't have to remember why I bookmarked a page in the first place because I can leave myself a note saying why.
- Lastly, I can archive a page in such a way that if it is ever removed, I will still have a copy of it.
Here is where to get Diigo (you can even upgrade your account by clicking on Education Edition on the right side of the screen) and here are two resources on how to use it.
A quick guide to annotation with Diigo.
A Guide to Annotating using Diigo from José Picardo on Vimeo.
This is a five minute video on how to organize bookmarks.
Remember this is just a Diigo primer. Learn three things about now and figure out the rest later. You don't need to know everything right now and you can't anyway!
Friday, August 23, 2013
Resources for New Teachers
There is nothing like your first year of teaching. It's exciting and scary at the same time. You have all these great ideas. And some of them get implemented and some of them don't and most often it's because we only have 24 hours in a day. And during that time we have to eat, sleep and teach. Sometimes it feels like that's all we're doing! But here's the thing, you don't have to reinvent the wheel and not every great idea needs to originate with you. People are sharing ideas at an ever increasing pace, so here are a FEW to help you on your way. Don't overwhelm yourself by looking at them all. Just pick one and then follow that strand. Remember, it's ok if you don't know (and do) everything right now.
- Visit 10 Digital Resources For New Teachers and find a variety resources to help manage your class and your time.
- If you use Twitter, consider following #ntchat (new teacher chat). Learn more from the founder Lisa Dabbs.
- Check out Edutopia's page on New Teacher Support. They pull from a bunch of different blogs to offer you the best of what's out there.
Wednesday, July 10, 2013
eduClipper
Today I learned about eduClipper. It's like Pinterest but you can use it with your students (Pinterest requires that its users be 13 years or older, as do most sites where you need to create an account.)
So just like pinning content, here you clip it. You can clip from Microsoft docs, webpages, Google docs, YouTube, etc. You can also create boards by using the little plus sign on the left. And you can create classes where you and your students can share ideas. You always have the option to be in full control of a board if you don't want your students to alter the content.
Try it out and post ideas about how you might use it in your classroom.

Subscribe to:
Posts (Atom)