If you are looking to expand your understanding of technology in education and you already have a sturdy foundation, I would recommend these three blogs to you. The last one, Edutopia, also has content related to all areas of education.
Educational Technology and Mobile Learning
The author, Med Kharbach, describes the blog as "a resource of educational tools and mobile apps for teachers and educators". Topics include: posters, iPad resources, teacher guides, YouTube for teachers, teacher tools and free downloads.
Free Technology for Teachers
Richard Byrne provides amazing free tools to teachers with quick explanations on how to use them. His tabs include: iPad apps for schools, Google tutorials, free guides, alternative to YouTube, video creation resources, and creating blogs and websites.
Edutopia
Edutopia is a wonderful resource tech tools, lessons, new teacher tips, grade level appropriate material, and almost any other topic related to education. They host educational blogs (which is why I have included it here), classroom guides, videos and educational resources. If ever you are stumped by a problem, I encourage you to look here.
Addendum:
Edudemic just reposted their "Fabulous Education Technology Blogs Worth Following".
Thursday, September 26, 2013
Tuesday, September 24, 2013
Embedding Videos
If you are still linking videos from a website, consider embedding them. When you embed a video, it shows up right on the page where you have placed the code. People visiting your page will be able to see the video in context without being directed away from that page and without having to open another window. Here are two ways to embed a video. You can either use YouTube or Google Drive.
Directions for Google Drive:
If you own the video (meaning you made it) and you do not wish to use YouTube as the host (perhaps you don't want any ads associated with your video), consider uploading it to Google Drive. Here's how to do that:


Directions for Google Drive:
If you own the video (meaning you made it) and you do not wish to use YouTube as the host (perhaps you don't want any ads associated with your video), consider uploading it to Google Drive. Here's how to do that:
- Log on to Google Drive, click on the upload button (it's the red arrow pointing up and it's next to the Create button on the left side of the screen).

- Select your video to upload.
- Once the video is uploaded, select it and click on the Share button to change viewing access from Private to Public if you want to host it on a blog or website.
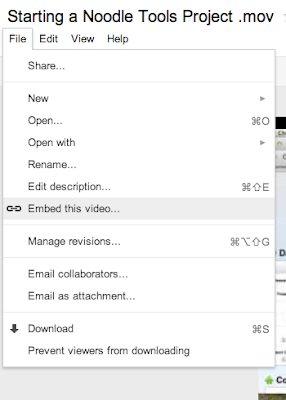
- Right-click on the uploaded video file and select Open with – Google Drive Viewer.
- Once it opens, click on the file menu in the top left corner and select embed this video.

- Copy and paste the code into the HTML view of your website.

Directions for YouTube:
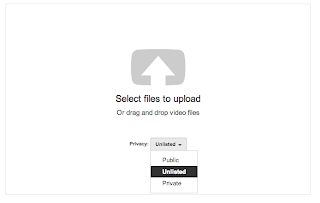
- Once signed in on YouTube (use your Google sign in), click on the upload button.
- Change the privacy setting to Unlisted and the either drag your video into the upload box or select it from the browser menu.

- Click on the video link

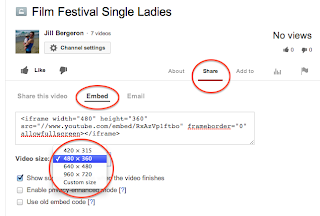
- Look for the Share button below the video and click there. Then choose embed. From here you can select how big you wish your video to be. If you click on "custom" you can specify the exact size of your video.

- Paste that code into the HTML view of your website.
Thursday, September 5, 2013
Pinterest, Evernote and Pocket
I read an article last year by a person who said that there are three tools that allow him to be super efficient in his work. Two of those tools were Pocket and Evernote. I wish I could remember who posted the article so I could give him proper credit; alas, I didn't save it to either Pocket, Evernote or Diigo- how ironic! Oh well, let's move ahead. Below I'll quickly explain how and why I use each tech tool. If you want to see a screencast of this information, click on the video at the bottom.
Pinterest: Pinterest is a visual curation site. Think of it as a bulletin board where you can tack up images of things you like. It's great for collecting ideas that have some visual component to them. In terms of education, you might use it for classroom design or projects with students. For me, Pinterest is more for personal collections- cooking, home decor, fashion.
Evernote: Evernote is an application that let's you write notes and access them anywhere. If you download the application to all of your devices (phone, tablet, computer), you can easily access your notes anywhere. You can also access them via the web which means if you are without your personal devices, you can still get hold of your notes. Furthermore, you can tag (label) your notes in multiple way and save them to folders. This means if you can't quite remember where you put that note, you can type in one of your tags and find it. Last bit on Evernote...you can also save websites here. This way you have your notes and websites in the same place. You can also highlight and take notes just like in Diigo.
Pocket: Pocket used to be known as Read It Later. Here's how it works. Once you have downloaded the extension for your browser (a little button that lives in your browser toolbar), you can click when you are on a webpage that you want to come back to later. This isn't a bookmarker per se. Think of it more as a place where you collect all of those pieces you want to read when you FINALLY have time! Once you are finished reading the article, you either delete it or archive it OR... you could even save it to Evernote or Diigo.
Tuesday, September 3, 2013
The Value of Diigo
Diigo, while not new, is still worth writing about. Many of us are used to bookmarking within our web browser. And while that has been a fine organization system for years, it might be time to upgrade. It's just a little button that typically sits near your address bar. If you are reluctant to change over to a social bookmarking platform, consider these points:
You might be thinking, "yes, all of these features are great, but is it really SO much better than a web browser?" For me the answer is yes and here is why I am using Diigo.
Here is where to get Diigo (you can even upgrade your account by clicking on Education Edition on the right side of the screen) and here are two resources on how to use it.
A Guide to Annotating using Diigo from José Picardo on Vimeo.
Remember this is just a Diigo primer. Learn three things about now and figure out the rest later. You don't need to know everything right now and you can't anyway!
- Diigo allows you to access your bookmarks on any device at any time.
- You can organize them by tags (think of these as labels) which means that a bookmark can be labeled in multiple ways. So the website doesn't have to live in one folder. It will even suggest tags based on the site's content.
- Moreover, you can easily share your bookmarks with others. And, yes, you can import your bookmarks from your old web browser.
- As you read, you can highlight and take notes. These stay with your website whenever you open it.
You might be thinking, "yes, all of these features are great, but is it really SO much better than a web browser?" For me the answer is yes and here is why I am using Diigo.
- I can ask my students to read an online source and take notes. Then I can show them my notes and share them as well. They'll learn from modeling.
- I don't have to scroll through long lists of sites anymore. Just type in a tag and up come the sites I have associated with that tag.
- I don't have to remember why I bookmarked a page in the first place because I can leave myself a note saying why.
- Lastly, I can archive a page in such a way that if it is ever removed, I will still have a copy of it.
Here is where to get Diigo (you can even upgrade your account by clicking on Education Edition on the right side of the screen) and here are two resources on how to use it.
A quick guide to annotation with Diigo.
A Guide to Annotating using Diigo from José Picardo on Vimeo.
This is a five minute video on how to organize bookmarks.
Remember this is just a Diigo primer. Learn three things about now and figure out the rest later. You don't need to know everything right now and you can't anyway!
Subscribe to:
Posts (Atom)